Large Data Upload with Bundlr
This demo is not fully functional at this time. The team is continually developing the gRPC node's capabilities. Thank you for your understanding and continued support.
When you have large pieces of data such as images or blog entries, you wouldn't want to store them to WeaveDB. But you would store them directory in Arweave Storage and store a tiny piece of metadata (transaction ID) to WeaveDB to link to them.
WeaveDB with Arweave Storage is equivalent to Firestore with Cloud Storage, or DynamoDB with S3 storage. You can use a relayer to securely store large data and bind them with WeaveDB indexes.
For this example, we will build a simple markdown note taking dapp where you can publish notes through Bundlr (opens in a new tab) with a WeaveDB relayer.
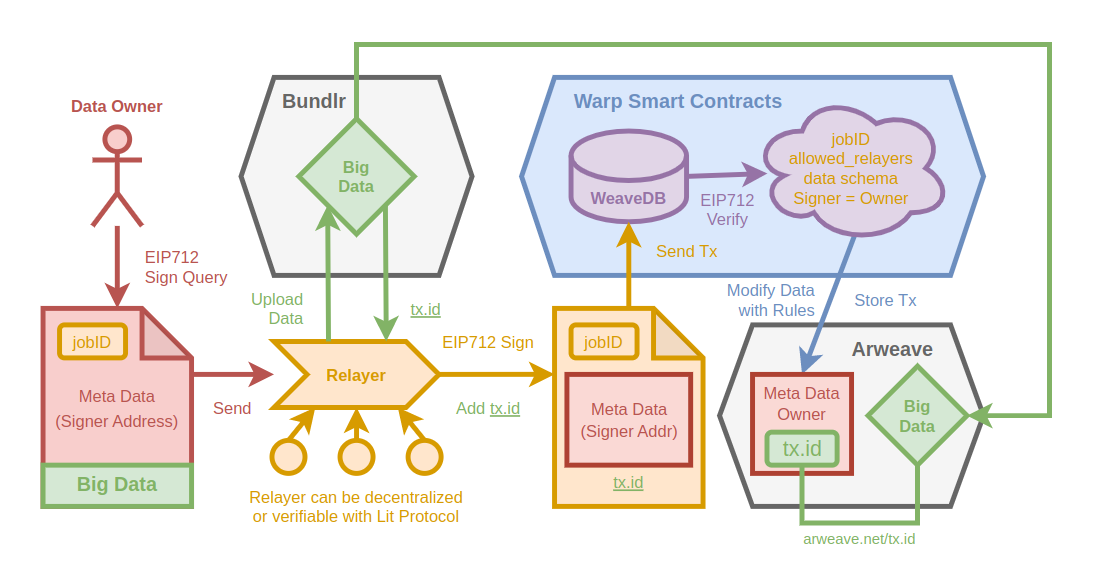
- A relayer job can be preset on the WeaveDB instance with
jobId,allowed_relayers,extra data schema. All the conditions must be met before relayed queries go through. - The data owner signs metadata to attach to the
noteand send thesigned queryand thenoteto the relayer. - The relayer upload the
noteto Arweave using Bundlr and get thetx.idfor it, attach thetx.idas an extra piece of data, then sign it with eip712, then send the transaction to the WeaveDB contract on Warp. - The WeaveDB contract verifies the eip712 signatures and validates
jobID,allowed relayersandextra data schema. - The initial query data can be modified with access control rules on the collection. We will check if the
signeris the dataowner, and add theownerandtx.idto the original data. - To access the
note, the frontend dapp can first get the metadata from WeaveDB and use thetx.idto fetch thenoteatarweave.net/[tx.id].
In practice, you would use a verifiable relayer with the Lit Protocol integration for more security.
You can also encrypt the notes using Lit Access Conditions.
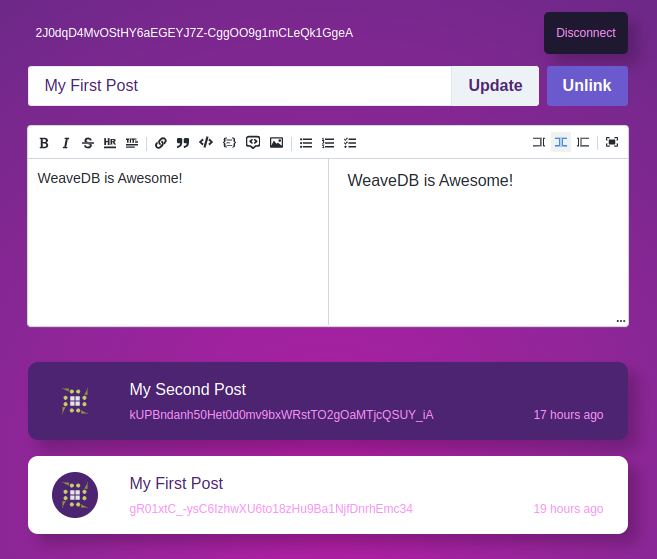
A demo dapp is deployed at relayer-bundlr.vercel.app (opens in a new tab).
Frontend Dapp
Clone the Repo
git clone https://github.com/weavedb/weavedb.git
cd weavedb
yarn
Deploy WeaveDB Contracts
node scripts/generate-wallet.js mainnet
yarn deploy
Or you could follow this guide and use the Web Console (opens in a new tab).
Now you should receive contractTxId for the deployed contract.
Configure DB Instance
We will show you one command script to set up everything in the end, but these are what needs to be set up.
Set up Data Schema
We are going to set up only 1 collection.
notes: a collection of notes
const schema = {
  type: "object",
  required: ["date", "id", "author", "title"],
  properties: {
    title: {
      type: "string",
    },
    date: {
      type: "number",
    },
    id: {
      type: "string",
    },
    author: {
      type: "string",
    },
  },
}
await sdk.setSchema(schema, "notes", { ar: wallet })date: published dateid: Arweave Transaction IDauthor: author of the notetitle: title of the note
Set up Relayer Job
Set a simple relayer job.
relayerAddress: an EVM address of the relayer to sign and relay WeaveDB queries.schema: JSON schema for the additional data to be attached by the relayer. The relayer will attach 3 pieces of extra data,date,id, andauthor.jobID: our arbitrary jobID will bebundlr.
const job = {
  relayers: [relayerAddress],
  schema: {
    type: "object",
    required: ["date", "id", "author"],
    properties: {
      date: {
        type: "number",
      },
      id: {
        type: "string",
      },
      author: {
        type: "string",
      },
    },
  },
}

await sdk.addRelayerJob("bundlr, job, { ar: wallet })
With these simple settings, we expect the relayer to receive the author, title, and body content before adding the date and uploading it to bundlr.
Finally, it relays the signed WeaveDB query with extra data of (author, date, id) to the signed query.
Set up Access Control Rules
const rules = {
  "let create,update": {
    "resource.newData.author": { var: "request.auth.extra.author" },
    "resource.newData.date": { var: "request.auth.extra.date" },
    "resource.newData.id": { var: "request.auth.extra.id" },
  },
  "allow create": {
    "==": [{ var: "request.auth.signer" }, { var: "resource.newData.author" }],
  },
  "allow update,delete": {
    "==": [{ var: "request.auth.signer" }, { var: "resource.data.author" }],
  },
}

await sdk.setRules(rules, "notes", { ar: wallet })
let create,update will copy author, date, id from the relayer extra data when a note is being created or updated.
allow create will check if the signer is the author of the new note.
allow update,delete will check if the signer is the author of the existing note.
Set up Everything with Script
To set up everything with one command, run the following.
node scripts/bundlr-setup.js mainnet YOUR_CONTRACT_TX_ID RELAYER_EVM_ADDRESSSet up Local gRPC Node
For a better performance for the relayer, you would want to set up a local grpc node.
Follow this tutorial to do so.
Set up Bundlr
The relayer needs to upload notes to Bundlr and add the tx.id to the signed query.
To set up Bundlr, you could also follow this tutorial (opens in a new tab) in their official docs.
Bundlr let you use many tokens from other blockchains to pay GAS for the Arweave storage.
For this example, we will fund our account with $MATIC on Polygon.
Install Bundlr SDK
yarn add @bundlr-network/clientFund a Node
You need to add some credit to the account for the relayer.
import Bundlr from "@bundlr-network/client";
const privateKey = "yourpolygonprivatekey";

const bundlr = new Bundlr.default("http://node1.bundlr.network", "matic", privateKey);

let response = await bundlr.fund(price);

// Get loaded balance in atomic units
let atomicBalance = await bundlr.getLoadedBalance();
console.log(`node balance (atomic units) = ${atomicBalance}`);

// Convert balance to an easier to read format
let convertedBalance = bundlr.utils.unitConverter(atomicBalance);
console.log(`node balance (converted) = ${convertedBalance}`);
NextJS Frontend Dapp
Set up Environment Variables
Create .env.local file and set the following variables.
WEAVEDB_RPC_NODE="localhost:8080"
BUNDLR_PRIVATEKEY="Bundlr_EOA_Privatekey"
RELAYER_PRIVATEKEY="Relayer_EOA_Privatekey"

NEXT_PUBLIC_WEAVEDB_CONTRACT_TX_ID="Your_Contract_Tx_Id"
NEXT_PUBLIC_WEAVEDB_RPC_WEB="http://localhost:8080"
Set up Relayer
We will set up the relayer as NextJS serverless api located at /pages/api/bundlr.
The relayer
- constructs a
noteobject - uploads it to Bundlr
- adds extra data of
{ id, author, date }to the user signed params - and relays the query to WeaveDB.
const Bundlr = require("@bundlr-network/client")
const contractTxId = process.env.NEXT_PUBLIC_WEAVEDB_CONTRACT_TX_ID
const { isNil } = require("ramda")
const SDK = require("weavedb-node-client")

export default async (req, res) => {
  const { body, params } = JSON.parse(req.body)
  const bundlr = new Bundlr.default(
    "http://node1.bundlr.network",
    "matic",
	process.env.BUNDLR_PRIVATEKEY
  )
  const note = {
    title: params.query[0].title,
    body,
    author: params.caller,
    date: Date.now(),
  }
  const tags = [
    { name: "Content-Type", value: "application/json" },
    { name: "appName", value: "weavedb-bundlr-test" },
  ]
  let error = null
  let success = false
  let relay_tx = null
  try {
    const bundlr_tx = await bundlr.upload(JSON.stringify(note), { tags })
    if (!isNil(bundlr_tx.id)) {
      const sdk = new SDK({
        contractTxId,
        rpc: process.env.WEAVEDB_RPC_NODE,
      })
      relay_tx = await sdk.relay(
        params.jobID,
        params,
        { id: bundlr_tx.id, author: note.author, date: note.date },
        {
          jobID: params.jobID,
          privateKey: process.env.RELAYER_PRIVATEKEY,
        }
      )
      if (relay_tx.success) {
        success = true
      } else {
        error = relay_tx.error
      }
    } else {
      error = relay_tx
    }
  } catch (e) {
    console.log(e)
    error = e
  }
  res.status(200).json({ success, error, tx: relay_tx })
}
Frontend Page
This is how you would get a note in the frontend code.
// getting 5 notes of the account in descending order by published date
const notes = await db.get("notes", ["author", "==", account], ["date", "desc"], 5)

// fetching the body of the first note
const note = await fetch(`https://arweave.net/${notes[0].id}`).then(v => v.json())
The rest of the frontend code will be omitted as it's not the primary focus of this tutorial. You can access the entire code here (opens in a new tab).