Relayers
Relayers can execute queries on behalf of you using your eip-712 signatures (opens in a new tab).
This comes in handy, when making cross-chain state verifications with off-chain oracles.
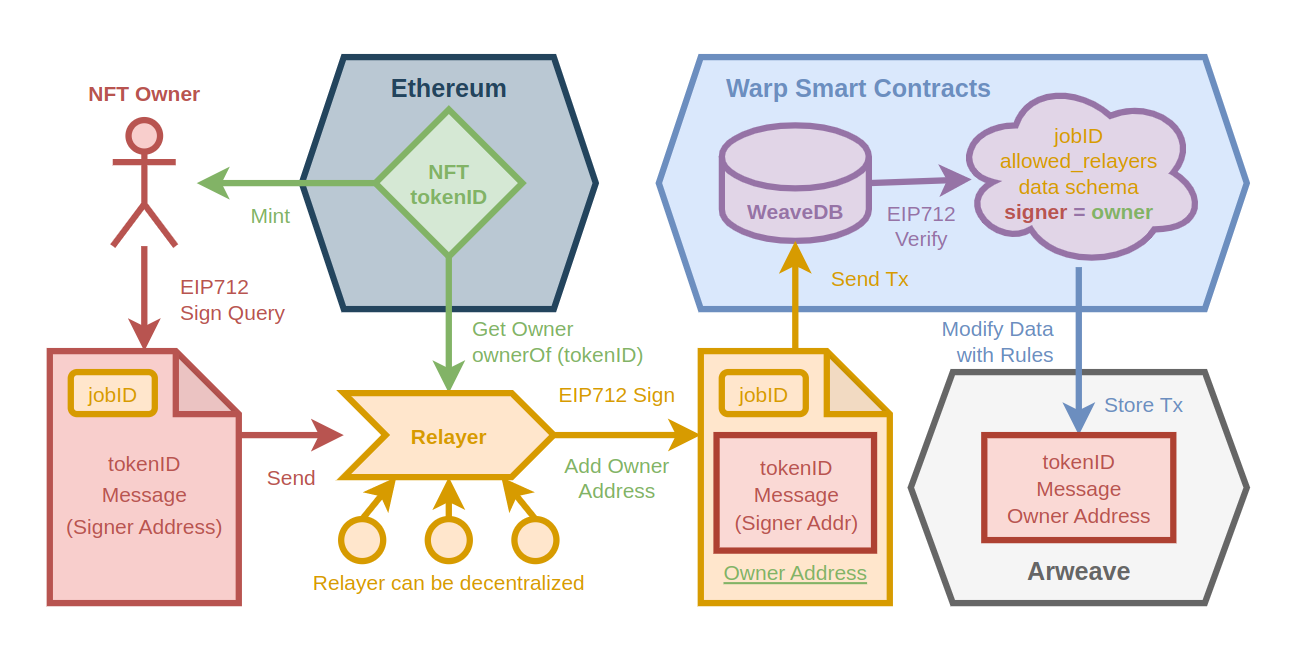
See an example use case to authenticate NFT owners here.
Add Relayer Jobs
Before relayers can relay queries, relayer jobs need to be defined in the WeaveDB contract.
/*
const schema = {
  type: "object",
  required: ["height"],
  properties: { height: { type: "number" } }
}
*/
await db.addRelayerJob("jobID", { schema, relayers })
Parameters
jobID: an arbitrary string ID for the job. This is the only required parameter.schema: a json schema for the extra data relayers will add to the query.relayers: an array of EVM addresses allowed to relay the job. If unassigned, anyone can relay the job.
Optional Parameters for Multisig Relayer
multisig: the number/percent of valid relayer signatures requiredmultisig_type: a type of the relayer validation (number|percent)signers: an array of addresses approved for eip-191 multisig, only used whenmultisig_typeis specified.
Multisig Types
-
If
multisig_typeis setpercentandmultisigis set50%, 2 valid signatures must be presented when there are 4 allowedrelayers. -
If
multisig_typeis setnumber(orundefined) andmultisigis set5, 5 valid signatures must be presented.
List Relayer Jobs
await db.listRelayerJobs()Get Relayer Job
await db.getRelayerJob("jobID")Remove Relayer Job
await db.removeRelayerJob("jobID")Sign Jobs
Before sending a query to a relayer, you need to sign the query with a jobID.
const data = { name: "Bob", age: 20 }
const relay_query = await db.sign("set", data, "ppl", "Bob", { jobID: "jobID" } )
/*
{
  function: "set",
  query: [data, "ppl", "Bob"],
  signature: "xyz...",
  nonce: 1,
  caller: "0xyouraddress...",
  jobID: "jobID"
}
*/
Then send it to one of the allowed relayers for the job.
Relay Jobs
As a relayer, you should know what the relay query is requesting from jobID. extra data can be added as the 3rd parameter, which must match the relay job schema defined in the contract.
// const extra = { height: 180 }
await db.relay("jobID", params, extra)
Multisig Relayer
For relayer decentralization, you can require a certain number or percent of signatures for relay queries to be approved.
The multisig signatures should be EIP191 (opens in a new tab) personal signatures instead of EIP712.
The data format to be signed should be { extra, jobID, params }.
EIP191 signatures can be made by the signMessage method with Ethers.js Signers (opens in a new tab).
// each signer signs after their own validations at different locations
const sig1 = await signers.signMessage(JSON.stringify({ extra, jobID, params }))

// after collecting signatures(sig1, sig2, sig3) from approved signers
await db.relay("jobID", params, extra, { multisigs: [ sig1, sig2, sig3 ] })
Verifiable Oracles with Lit Protocol
Lit Protocol (opens in a new tab) enables decentralized private keys (PKP (opens in a new tab)) with threshold cryptography, and decentralized executions of verifiable code (Lit Actions (opens in a new tab)).
With the mint-grant-burn mechanism (opens in a new tab), we can be sure signatures from a certain PKP only come from the result of executing a certain code stored at a certain IPFS hash. In other words, Lit allows smart contracts to have private keys no one else but the contract with its immutable code can sign.
By leveraging PKP and Lit Actions, you can have only one PKP signer instead of multiple EOA signers/nodes to set up a trustless relayer.
Lit Protocol takes care of the decentralization part, and if we can verify that with cryptography, WeaveDB relayers don't need decentralization with multiple trustful validators for secure oracles/bridges.
You could use Lit Explorer (opens in a new tab) to mint PKPs and create Lit Actions, but the UI is limited to basic usages for now. To set up a verifiable relayer, you need to take manual steps without the explorer.
Save Lit Action to IPFS
You can use Pinata (opens in a new tab) to upload your Lit Action files to IPFS and they will be immediately available through the Cloudflare gateway (opens in a new tab). The IPFS CID will be used in the next step. So take note when you upload Lit Actions.
This example Lit Action will check the owner of a specified tokenID in the query and add the owner as extra data, then create a valid signature for multisig relayer verification with WeaveDB.
const go = async () => {
  for (const v of [
    infura_key,
    params,
    params.jobID,
    publicKey
  ]) {
    if (v === null || typeof v === "undefined") return
  }

  const abi = [
    {
      inputs: [
        {
          internalType: "uint256",
          name: "tokenId",
          type: "uint256",
        },
      ],
      name: "ownerOf",
      outputs: [
        {
          internalType: "address",
          name: "",
          type: "address",
        },
      ],
      stateMutability: "view",
      type: "function",
    },
  ]

  let owner = "0x"
  const tokenID = params.query[0].tokenID
  try {
    const provider = new ethers.providers.JsonRpcProvider(
      "https://goerli.infura.io/v3/" + infura_key
    )
    owner = await new ethers.Contract(
      "0xfF2914F36A25B5E1732F4F62C840b1534Cc3cD68",
      abi,
      provider
    ).ownerOf(tokenID)
    const data = {
      extra: owner,
      jobID: params.jobID,
      params,
    }

    const sigShare = await LitActions.ethPersonalSignMessageEcdsa({
      message: JSON.stringify(data),
      publicKey,
      sigName: "sig1",
    })
    LitActions.setResponse({
      response: JSON.stringify({ message: data }),
    })
  } catch (e) {
    return
  }
}

go()
Mint-Grant-Burn PKP
Now, you need to manually call the mintGrantAndBurnNext function at the PKPNFT contract (opens in a new tab) on Chronicle Lit testnet.
This function mints a PKP and assigns it to an ipfsCid then burn it in a single transaction, which is the only way to verify the PKP signatures come from only single Lit Action (opens in a new tab). If PKPNFT is burnt after being assigned to an ipfsCid, no one else but the code at the ipfsCid can sign with the PKP.
Get some testnet LIT token from the official Chronicle faucet (opens in a new tab).
const bs58 = require("bs58")
const LitJsSdk = require("lit-js-sdk/build/index.node.js")
const { JsonRpcProvider, Wallet, Contract, utils } = require("ethers")
const privatekey = "xyz..." // this could be any account since the NFT will be immediately burnt

const abi = [
  {
    inputs: [
      {
        internalType: "uint256",
        name: "keyType",
        type: "uint256",
      },
      {
        internalType: "bytes",
        name: "ipfsCID",
        type: "bytes",
      },
    ],
    name: "mintGrantAndBurnNext",
    outputs: [
      {
        internalType: "uint256",
        name: "",
        type: "uint256",
      },
    ],
    stateMutability: "payable",
    type: "function",
  },
]

function getBytesFromMultihash(multihash) {
  const decoded = bs58.decode(multihash)
  return `0x${Buffer.from(decoded).toString("hex")}`
}

const go = async () => {
  const provider = new JsonRpcProvider(
    "https://chain-rpc.litprotocol.com/http"
  )
  const wallet = new Wallet(key, provider)
  const contract = new Contract(
    "0x8F75a53F65e31DD0D2e40d0827becAaE2299D111",
    abi,
    wallet
  )
  const tx = await contract.mintGrantAndBurnNext(
    2,
    getBytesFromMultihash("YourIpfsCid"),
    { value: "1" }
  )
  console.log(await tx.wait())
}

go()
Go check the latest transaction at the PKPNFT contract (opens in a new tab), and get the tokenID which has just been burnt.
Now go to the PKP page on the Lit Explorer https://explorer.litprotocol.com/pkps/[tokenID] (opens in a new tab), and get the PKP Public Key and the ETH Address.
Relayer Serverless Function
Even though, the PKP doesn't require your authSig to sign, you still need to provide one to the LitAction. AuthSig can be obtained with the following code in a browser.
const LitJsSdk = require("lit-js-sdk")
const authSig = await LitJsSdk.checkAndSignAuthMessage({ chain: "polygon" });
Relayers can be a simple serverless function. The following is a serverless function using the NestJS pages/api directory.
const { utils } = require("ethers")
const { pluck, compose, map, filter, append } = require("ramda")
const SDK = require("weavedb-node-client")
const LitJsSdk = require("lit-js-sdk/build/index.node.js")
const contractTxId = process.env.NEXT_PUBLIC_WEAVEDB_CONTRACT_TX_ID

export default async (req, res) => {
  const params = JSON.parse(req.body)
  const tokenID = params.query[0].tokenID
  try {
    const litNodeClient = new LitJsSdk.LitNodeClient({ litNetwork: "serrano" })
    await litNodeClient.connect()
    const authSig = {
      sig: process.env.AUTHSIG_SIG,
      derivedVia: process.env.AUTHSIG_DERIVEDVIA,
      signedMessage: process.env.AUTHSIG_SIGNEDMESSAGE,
      address: process.env.AUTHSIG_ADDRESS,
    }
    const _res = await litNodeClient.executeJs({
      ipfsId: process.env.LIT_ACTION_IPFSID,
      authSig,
      jsParams: {
        infura_key: process.env.INFURA_KEY,
        params,
        publicKey: process.env.LIT_PUBLICKEY1,
      },
    })
    const _sig = _res.signatures.sig1
    const sig = utils.joinSignature({
      r: "0x" + _sig.r,
      s: "0x" + _sig.s,
      v: _sig.recid,
    })

    const sdk = new SDK({
      contractTxId,
      rpc: process.env.WEAVEDB_RPC_NODE,
    })

    const tx = await sdk.relay(
      params.jobID,
      params,
      _res.response.message.extra,
      {
        multisigs: [sig],
        jobID: params.jobID,
        privateKey: process.env.RELAYER_PRIVATEKEY,
        wallet: process.env.RELAYER_ADDRESS,
      }
    )
    res.status(200).json({ success: true, tx })
  } catch (e) {
    res.status(200).json({
      success: false,
    })
    return
  }
}
Use Relayer Extra Data
You can access the relayer data via request.auth.extra in access control rules. For example, the following rules will set the height field to the new data to be written.
// request.auth = { signer, relayer, jobID, extra }
const rules = {
  let: {
    "resource.newData.height": { var: "request.auth.extra.height" },
  },
  "allow set": { "==" : [{var: "request.auth.jobID"}, "jobID"] }
}

await db.setRules(rules, "ppl") // only the contract owners can set rules
Internal Writes
You can let other Warp contracts write to your WeaveDB instance. In this case, the other contract works as a relayer and you can control the behavior through access control rules.
For example, let's set up a simple contract to write to a WeaveDB contract. Deploy it and get the contractTxId.
export async function handle(state, action) {
  await SmartWeave.contracts.write(action.input.to, {
    function: "relay",
    query: [action.input.params.jobID, action.input.params, { height: 180 }],
  })
  return { state }
}
Then, set up a relayer job named add-height to allow internal writes. relayerContractTxId is the intermediary contract writing to your WeaveDB contract (the one above). Contracts cannot sign to pass the relayer signature validation, to circumvent this, set internalWrites to true.
const jobID = "add-height"
const job = {
  relayers: [relayerContractTxId],
  internalWrites: true
}
await db.addRelayerJob(jobID, job)
You can also set up access control rules to add height to the uploaded doc. Note this is overly simplified.
const rules = {
  "let create": {
    "resource.newData.height": { var: "request.auth.extra.height" },
  },
  "allow create": true,
}
await db.setRules(rules, "ppl")
Now, you can try setting a new person through the outer contract.
const { WarpFactory } = require("warp-contracts")
const warp = WarpFactory.forMainnet()
const contract = warp
  .contract(relayerContractTxId)
  .connect(any_arweave_wallet)
  .setEvaluationOptions({ internalWrites: true, allowBigInt: true })

const data = { name: "Bob", age: 20 }
const params = await db.sign("set", data, "ppl", "Bob", { jobID: "add-height" })
await contract.bundleInteraction({ function: "relay", to: contractTxId, params })
Finally, you get Bob with height field added.
await db.get("ppl", "Bob")
// { name: "Bob", age: 20, height: 180 }
Set up Relayer via Web Console

-
Set a distinct name in
Job Nameinput field. This will be used as an ID for the relayer job. This is the only required parameter. -
Set an EVM or Arweave addresses allowed to relay the job in the
Relayersinput field, then clickAdd Relayerbutton. If unassigned, anyone can relay the job. -
Choose a type of the relayer validation from the dropdown ( none | number | percent). Set the
Multisiginput field to0or leave it empty ifnoneis chosen from the dropdown. -
When multisig relayer type is set to
numberorpercent, set the addresses approved for multisig in theSignersinput field. -
Set JSON schema for the additional data to be attached by the relayer. If none, set
{ }inside the text area.